


Russian, English, Italian, Spanish, German, French, Danish, Polish.
Questions and answers
How to I obtain service for these machines?
Parts are available from your dealer and the manufacture. In most case you would either install parts yourself or hire a local company that specializes in restaurant/food equipment or automated machine control services.
What is the warranty period?
All machines are warrantied for 1 year from purchase. If you need a part during the warranty period we will ship it to you without cost.
The warranty does not cover bulbs and v-belts.
What seasonings can be used in Robopop popcorn machine?
You can use any standard salt material, including Flavacol seasoning.
Theoretically you can use any dry granular seasoning, but not those that are in powder form or those that cake easily.
How can we keep popcorn crunchy during prolonged storage?
There a few tips to keeping popcorn crunchy and tasty.
1. Humility you be kept blow 50% during the popping process, and lower is better.
2. Make sure to tightly close storage bags and containers. We recommend our company’s brand transparent 400 liter capacity bags. They are easy to use and keep moisture out.
3. In cinemas or other large venues, keep popcorn in showcases warmers.
How to replace RP60/75 sifter drive roller?
Step #1: Remove the bolts that fix the roller bracket (1) to the frame:

Step #2: Remove the bolts that fix the motor bracket (2) to the frame:

Step #3: Remove the flush screws on the clutch (3). NOTE: there may be two or three bolts, depending on the design version:

Step #4: Detach the motor, the clutch, and the roller.
Step #5: If silicone liner (4) needs to be added, remove the bolts that fix the motor (5) to the motor bracket (2):

Step #6: Insert the silicone liner and fix the motor to the motor bracket with the bolts.
Step #7: Put the clutch on the motor shaft, fix with two flush screws.
Step #8: Fix the motor bracket to the frame, but don’t tight the bolts completely.
Step #9: Insert the roller shaft in the clutch, fix the flush screw.
Step #10: Fix the roller bracket to the frame with bolts, don’t tight them completely.
Step #11: Pull the motor bracket upwards as possible (note elongated bolt holes on the motor bracket), then tighten up both bolts to fix the bracket to the frame. This is required to make the sifter angled, so oil won’t leak to the scrap tray.
Step #12: Tighten up the bolts on the roller bracket.
Step #13: Make sure the sifter lays evenly on all four wheels, adjust the angle of the idle roller, if necessary.
Step #2: Remove the bolts that fix the motor bracket (2) to the frame:
Step #3: Remove the flush screws on the clutch (3). NOTE: there may be two or three bolts, depending on the design version:
Step #4: Detach the motor, the clutch, and the roller.
Step #5: If silicone liner (4) needs to be added, remove the bolts that fix the motor (5) to the motor bracket (2):
Step #6: Insert the silicone liner and fix the motor to the motor bracket with the bolts.
Step #7: Put the clutch on the motor shaft, fix with two flush screws.
Step #8: Fix the motor bracket to the frame, but don’t tight the bolts completely.
Step #9: Insert the roller shaft in the clutch, fix the flush screw.
Step #10: Fix the roller bracket to the frame with bolts, don’t tight them completely.
Step #11: Pull the motor bracket upwards as possible (note elongated bolt holes on the motor bracket), then tighten up both bolts to fix the bracket to the frame. This is required to make the sifter angled, so oil won’t leak to the scrap tray.
Step #12: Tighten up the bolts on the roller bracket.
Step #13: Make sure the sifter lays evenly on all four wheels, adjust the angle of the idle roller, if necessary.
How to replace a kettle on the RoboSugar 20?


Remove the plastic cups and then disconnect the floating links from the kettle:
Remove the screw and washers that fixes the motor/gearbox assembly to the swing shaft of the kettle:

Take out the key from the keyway on the shaft:

Remove the screws that fix supports to the frame:


Remove the motor/gearbox from the shaft:

Disconnect all the wires that come out from the kettle cable duct from the components inside the electric box and also the wires for the inductive sensors that are mounted in the support (see below). Take out the old kettle (lift the whole kettle up) and take off the supports from the swing shafts of the kettle:

New kettle comes with bearings put on the swing shafts:


Remove the supports from the old kettle and install the new kettle in the reverse order. After new kettle is installed, connect the wires that come out from the kettle accordingly to the labels and the wiring diagram.
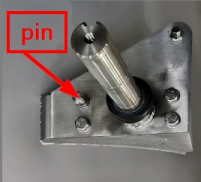
Check the operation of the end inductive sensors. When the kettle is in straight up position, the X4 LED indicator on the main PLC uint (Delta DVP14SS211T) should be on (lit up). When the kettle is dumped, X5 should be on. The gap between the sensor’s surface and actuating pin must be 2–3 mm:

The set of new kettle includes:
1x Kettle assembled
2x Kettle swing bearings (put on the kettle’s swing shafts):
1x Spare teflon pad for the mixer (pos.1, see the picture below)
1x Key (pos. 2)
1x M8 flatwasher (pos.3)
1x М8 spring washer (pos. 4)
1x M8 screw (pos. 5)
1x М8 flatwasher enforced (pos. 6)
1x Spare teflon collar for mixer shaft (pos. 7)
1x Mixer shaft collar (pos. 8)


Crepe machine problem. The bottom conveyor turns non-stop.
1. disconnect the crepe maker from the mains;

photo 1
2. remove the left cover of the crepe maker by unscrewing 4 screws fixing it (photo 1);
3. remove the "Start - Stop" handle by loosening its fastening to the stopper axis (2 set screws) (photo 1);
4. unscrew 4 screws securing the conveyor drive to the left inner wall of the crepe maker base (the screw heads are located near the conveyor coupling (photo 2, photo 3);

photo 2

photo 3
5. remove and inspect the conveyor actuator; pay attention to the condition of the micro switch rollers and the pressed thrust axle in the gear (photo 4). When removing the actuator, I recommend unscrewing the support leg of the crepe maker (one of the four, located directly under the drive attachment point) to the maximum.

photo 4
Proper operation of the actuator (in diagnostic state) is available at the link https://dropmefiles.com/q3YIv
Didn't find the answer to your question?Contact us and we will provide the necessary information. |
Ask a Question
|