en
it en es de zh fr
Robolabs USA

Request a call
About us
  • About RoboLabs
  • RoboLabs History
  • Patents & Certificates
  • Dealers
  • Privacy Policy
  • Conditions
Catalog
  • RoboPop Popcorn Machines
    RoboPop Popcorn Machines
  • RoboSugar Caramelizer
    RoboSugar Caramelizer
  • Cotton Candy Machines
    Cotton Candy Machines
  • Popcorn Display Warmers
    Popcorn Display Warmers
  • Automatic French Crepes
    Automatic French Crepes
  • Popcorn Accessories
    Popcorn Accessories
  • Popcorn Factory
    Popcorn Factory
Services
  • Showroom Trial
Projects
  • All projects
Support
  • Grand Robopop 220 Sifter
    • Documents
  • Grand Robopop220
    • Documents
  • RoboJetFloss 120V
    • Documents
  • RoboMix Mini
    • wiring diagram
    • manual mix mini
  • Robopop 75
    • Documents
  • Robopop25
    • Documents
  • Robopop60
    • Documents
  • RoboSugar 10
    • Documents
  • RoboSugar 20
    • Documents
  • SugarLips 10
    • Documents
  • SugarLips 20
    • Documents
  • Twister-M2, Monster
    • wiring diagram ACB-07
    • wiring diagram ACB-02U
    • wiring diagram ACB-02E
    • manual
Resources
  • News
  • Articles
  • FAQ
  • Reviews
Contact
    Robolabs USA
    About us
    • About RoboLabs
    • RoboLabs History
    • Patents & Certificates
    • Dealers
    • Privacy Policy
    • Conditions
    Catalog
    • RoboPop Popcorn Machines
      RoboPop Popcorn Machines
    • RoboSugar Caramelizer
      RoboSugar Caramelizer
    • Cotton Candy Machines
      Cotton Candy Machines
    • Popcorn Display Warmers
      Popcorn Display Warmers
    • Automatic French Crepes
      Automatic French Crepes
    • Popcorn Accessories
      Popcorn Accessories
    • Popcorn Factory
      Popcorn Factory
    Services
    • Showroom Trial
    Projects
    • All projects
    Support
    • Grand Robopop 220 Sifter
      • Documents
    • Grand Robopop220
      • Documents
    • RoboJetFloss 120V
      • Documents
    • RoboMix Mini
      • wiring diagram
      • manual mix mini
    • Robopop 75
      • Documents
    • Robopop25
      • Documents
    • Robopop60
      • Documents
    • RoboSugar 10
      • Documents
    • RoboSugar 20
      • Documents
    • SugarLips 10
      • Documents
    • SugarLips 20
      • Documents
    • Twister-M2, Monster
      • wiring diagram ACB-07
      • wiring diagram ACB-02U
      • wiring diagram ACB-02E
      • manual
    Resources
    • News
    • Articles
    • FAQ
    • Reviews
    Contact
      Robolabs USA
      • About us
        • Back
        • About us
        • About RoboLabs
        • RoboLabs History
        • Patents & Certificates
        • Dealers
        • Privacy Policy
        • Conditions
      • Catalog
        • Back
        • Catalog
        • RoboPop Popcorn Machines
        • RoboSugar Caramelizer
        • Cotton Candy Machines
        • Popcorn Display Warmers
        • Automatic French Crepes
        • Popcorn Accessories
        • Popcorn Factory
      • Services
        • Back
        • Services
        • Showroom Trial
      • Projects
        • Back
        • Projects
        • All projects
      • Support
        • Back
        • Support
        • Grand Robopop 220 Sifter
          • Back
          • Grand Robopop 220 Sifter
          • Documents
        • Grand Robopop220
          • Back
          • Grand Robopop220
          • Documents
        • RoboJetFloss 120V
          • Back
          • RoboJetFloss 120V
          • Documents
        • RoboMix Mini
          • Back
          • RoboMix Mini
          • wiring diagram
          • manual mix mini
        • Robopop 75
          • Back
          • Robopop 75
          • Documents
        • Robopop25
          • Back
          • Robopop25
          • Documents
        • Robopop60
          • Back
          • Robopop60
          • Documents
        • RoboSugar 10
          • Back
          • RoboSugar 10
          • Documents
        • RoboSugar 20
          • Back
          • RoboSugar 20
          • Documents
        • SugarLips 10
          • Back
          • SugarLips 10
          • Documents
        • SugarLips 20
          • Back
          • SugarLips 20
          • Documents
        • Twister-M2, Monster
          • Back
          • Twister-M2, Monster
          • wiring diagram ACB-07
          • wiring diagram ACB-02U
          • wiring diagram ACB-02E
          • manual
      • Resources
        • Back
        • Resources
        • News
        • Articles
        • FAQ
        • Reviews
      • Contact
      • Home page

      FAQ and Troubleshooting Robopop

      RoboFactory Quick Start Guide

      The equipment starts up in the following order

      1) Grand Robopop220

      2) Slurry stationVPM-OS2 (pre-heating)

      3) Transporting conveyor VP-K60-65

      4) Coating drum VPM-CS200

      5) Storage bin VPM-B300

      6) Slurry stationVPM-OS2 (oil pump)


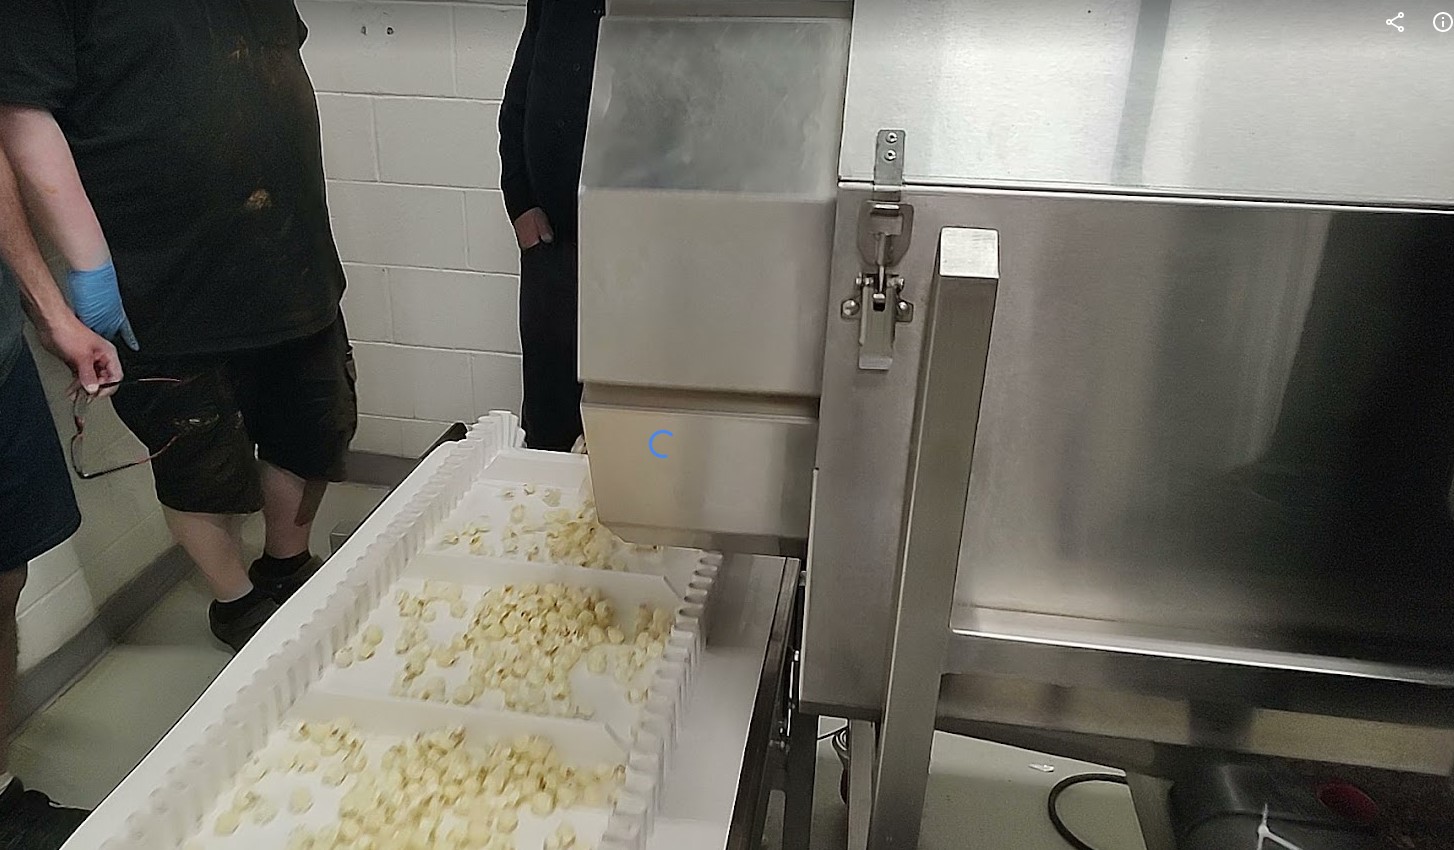
      Grand Robopop220 during operation, constantly repeats the same cycle - the grain goes into the chamber, it warms up, the grain explodes, the open popcorn falls into the sifter, and then goes from there to the conveyor belt. Visually, the Grand Robopop220 gives out popcorn in waves-style - sometimes more, sometimes less, then again more.

      The speed must be chosen so that at the moment of maximum ejection of grain, the conveyor has time to take it out from under the sifter and it does not fall off the conveyor onto the floor. At 230°C (446°F) on the Grand Robopop220, the conveyor speed is 55.

      For stable operation of the system, it is first necessary to fill the hopper with grain to the lower sensor (Low-level sensor). At 230°C (446°F), the Grand Robopop220 fills the hopper to the Lower Sensor level in approximately 20 minutes.

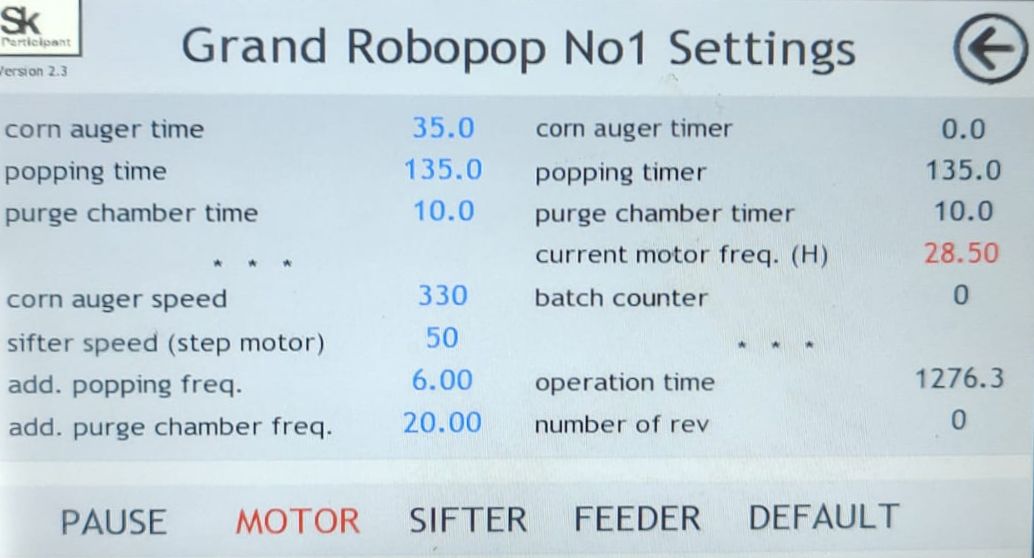
      Full Grand Robopop220 settings

      Corn auger time - 35

      Sifter speed - 50

      Popping time - 135

      Add pooping frequency - 6

      Purge chamber every - 10

      Add purge chamber frequency - 20

      Cjrn auger speed - 330


      It is important to set the Grand Robopop220's temperature and sifter rotation speed correctly - if the sifter rotates too slowly, the popcorn cannot exit the Grand Robopop220's working chamber effectively, and clogging chamber error may occur.

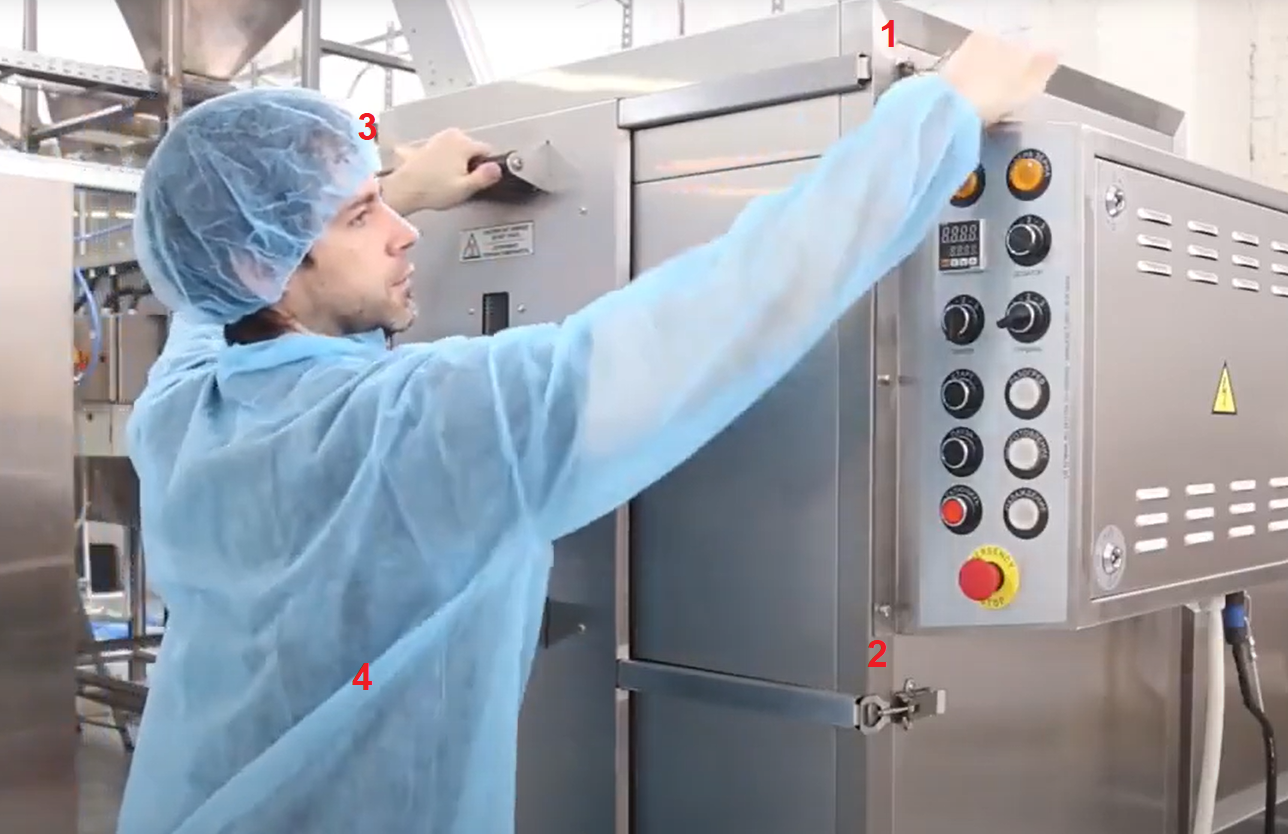
      The same thing can happen if the grain feed rate into the Grand Robopop220 chamber is too high - too much open grain can clog the chamber (clogger chamber alarm). The operating panel of the Grand Robopop220 offers a choice of device settings (electromechanical control - see picture).

      However, the touch-screen on the Control Box (Control panel VPM-CPS) of the RoboFactory line allows adjusting settings much more flexibly, increasing the productivity of the entire line and making all component's operations more stable.


      At the beginning of the working day, you need to run:

      1. Grand Robopop220 - set the temperature (in our case 230°C / 446°F), fill in the grain, and turn on the sifter. While the device is warming up, you can deal with the remaining elements of line

      2. Oil tanks - you need to fill them with a mixture (Slurry mix) and set the temperature. We recommend a cheese mixture temperature of 35-38°C (95-100°F). To do this, you need to manually turn on the toggle switches. Attention, if you fill in a small amount of oil, then overshoot/excess of temperature is possible. Fill with more oil.

      When the Grand Robopop220 starts making popcorn, turn on the conveyor (speed 55 on the touch-screen on the Control Box). The conveyor will fill the hopper with popcorn. During this time, the oil tanks are in mixing and heating mode, oil is NOT supplied to the system.


      When the Low-level sensor (inside hopper/collecting bin) stops lit - there is enough popcorn in the hopper, you can start the main process. Turn on the rotation of the Coating drum (speed 25-30) and turn on the infrared heaters on it. Turn on the vibration of the hopper and feeder (recommended level 90-100). Turn on the oil supply (recommended level 15-17). You will see how the oil went through the hose. Ideally, the operator will adjust the system so that the slurry mix and the popcorn enter the drum at the same time. If the first batch of popcorn is not really good (which is ok in the beginning at the start), you can put it back in the hopper to run it in the coating drum a second time.


      When the RoboFactory line is running, it is important to add oil/slurry mix on time and add popcorn kernels to the Grand Robopop220. The rest of the operations the line performs automatically.


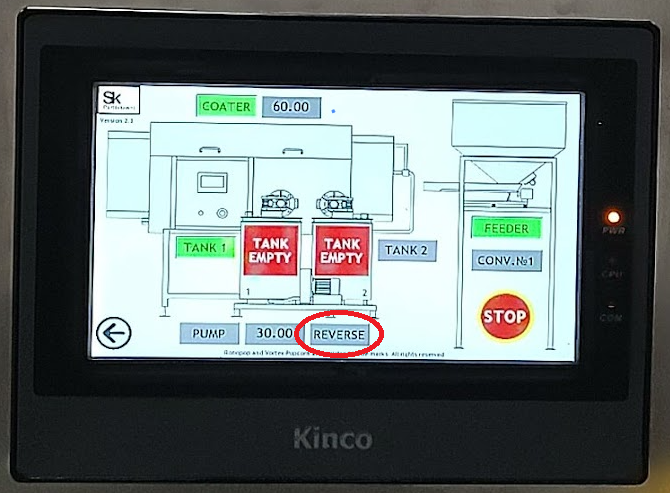
      If you want to pause your work (up to 5 minutes), it is important to correctly pause the line.

      Pause up to 5 minutes:

      1. Turn off the oil supply. Immediately turn on the reverse on the pump - this is important so that the oil does not freeze in the tubes (otherwise you will have to disassemble and wash the entire hose system, valves, and peristaltic pump).

      2. Turn off the vibration on the hopper/collecting bin.

      3. The drum can rotate - it will finish mixing the incoming ingredients, and then it will simply rotate to idle.

      4. The Grand Robopop220 and the conveyor can also continue to work - they will fill the hopper with popcorn.


      Line stop (Not Emergency stop)

      If you want to stop the line for a longer period - be sure to follow this order:

      1. Turn off Grand Robopop220. This machine takes a long time to cool down, so it will still dispense popcorn for a while.

      2. At the end of the day, do not leave popcorn in the hopper - it will absorb moisture, and become soft (lose crispy properties). Run and wait until the hopper/collecting bin is empty.

      3. When the vibrating tray (under the collecting bin) stops supplying popcorn to the Coating drum, turn off the oil supply. Immediately reverse the oil pump! It is important to collect the remaining oil/slurry mix back into the tanks.

      4. Turn off the vibration on the hopper. Wait until the Coating drum will finish mixing the last remaining popcorn.

      5. When the Coating drum is empty - turn off the rotation of the drum. Turn off the infrared heaters (button on the Coating drum panel).

      6. Unscrew the wing nut, remove the spout and remove the oil supply tube.

      7. Insert an oil tube into an empty oil bucket, turn on the pump and drain any residue from the tanks into the bucket (use the valve to choose the tank). When both oil tanks are empty, turn off the oil pump.

      To prevent the oil from freezing in the hoses, you must immediately rinse the oil system with warm water. Prepare several buckets of warm water, pour water into both tanks, and turn on the rotation. Place the end of the hose in an empty bucket and turn on the pump - dirty water with the mixture residue will leave the tanks and clean the hoses from inside. Repeat this operation a few times.

      it is important that the water temperature should not exceed 70°C (160°F). Oil system hoses are not heat resistant. Working with very hot water reduces their life, as well as the life of the oil pump.

      When you have cleared both tanks and hoses of oil residue, turn off the oil station. Take a cotton swab (these are used to clean the ears) and gently wipe the area around the volumetric sensor inside each tank - it is important to remove residual dirt for the sensor to work adequately.


      Coating drum cleaning 

      There are several options for cleaning the drum. One of them (the main one) is described in the Operating Manual for Coating drum VPM-CS200.

      Turn off the drum, and disconnect the infrared heater power cable from the right side.


      Release the 4 latches and remove the top cover. Use the helper to remove the whole drum, and wash it with hot water to remove popcorn and oil residue.

      Wash the device from the inside. Pay attention to the wheels on which the drum is spinning - remove the husks, popcorn parts, and oil traces from each wheel. It is important that they are clean because due to oil residues they can slip and the drum will not spin.


      The conveyor and hopper/collecting bin are the easiest to clean - a damp cloth and ordinary detergent are enough. Wipe them off any leftover popcorn. These elements do not get into contact with oil, so their cleaning is quite simple.


      Grand Robopop220 - as you remember, we turned it off the very first. It takes a long time to cool, so we clean it last. Make sure the body of the machine is cool down (warm but not hot). Release the 4 latches and remove the cooking chamber door/cover.

      Use a vacuum cleaner to remove the remains of burnt popcorn and husks inside the cavity and door.

      Clean the sifter - empty the surface tray.

      Remove the top cover - unfasten 4 locks, take out the drum, and clean the area around the wheels. If the wheels are in the husk, they may begin to slip and the sifter drum of the Grand Robopop220 will spin.


      At the very end, turn off the Control box, and turn off the oil station and the coating drum using the buttons on the device case.


      Brief recommendations for cleaning equipment.


      Cleaning of each element (briefly, see details in the manual for each element)

      Grand Robopop220 - wait until it cools down. The Grand Robopop220 is the first to turn off, so by the time you turn it off and wash everything else, it will just cool down. Remove the sifter lid, remove the sifter, and discard the husk, skin, debris, unopened grains, and half-opened grains. Vacuum everything. Pay special attention to roller wheels - they should not be greasy, and husks should not stick so that nothing scrolls.

      Open the chamber of the Grand Robopop220, and vacuum up the burnt grains and dust. Remove any remaining grain from the hopper so that it does not dry out.


      Conveyor. Wipe stainless steel with a damp cloth. You can moisten it with detergent, and then remove its remnants with a dry cloth.

      Clean the plastic conveyor belt with SynClean LF and SynClean HD.

      It is necessary to periodically check the tension of the conveyor belt: during the first 1000 hours of operation, the tension is checked every 50 hours of operation (once a week). Then every 250 hours (once a month). The tightening force of the bolts is 45-newton * meters.

      The bearing on the drive roller must be lubricated on both sides once a month.

      Use Shell Alvania RL 2.3 or Castrol LM, LMX.

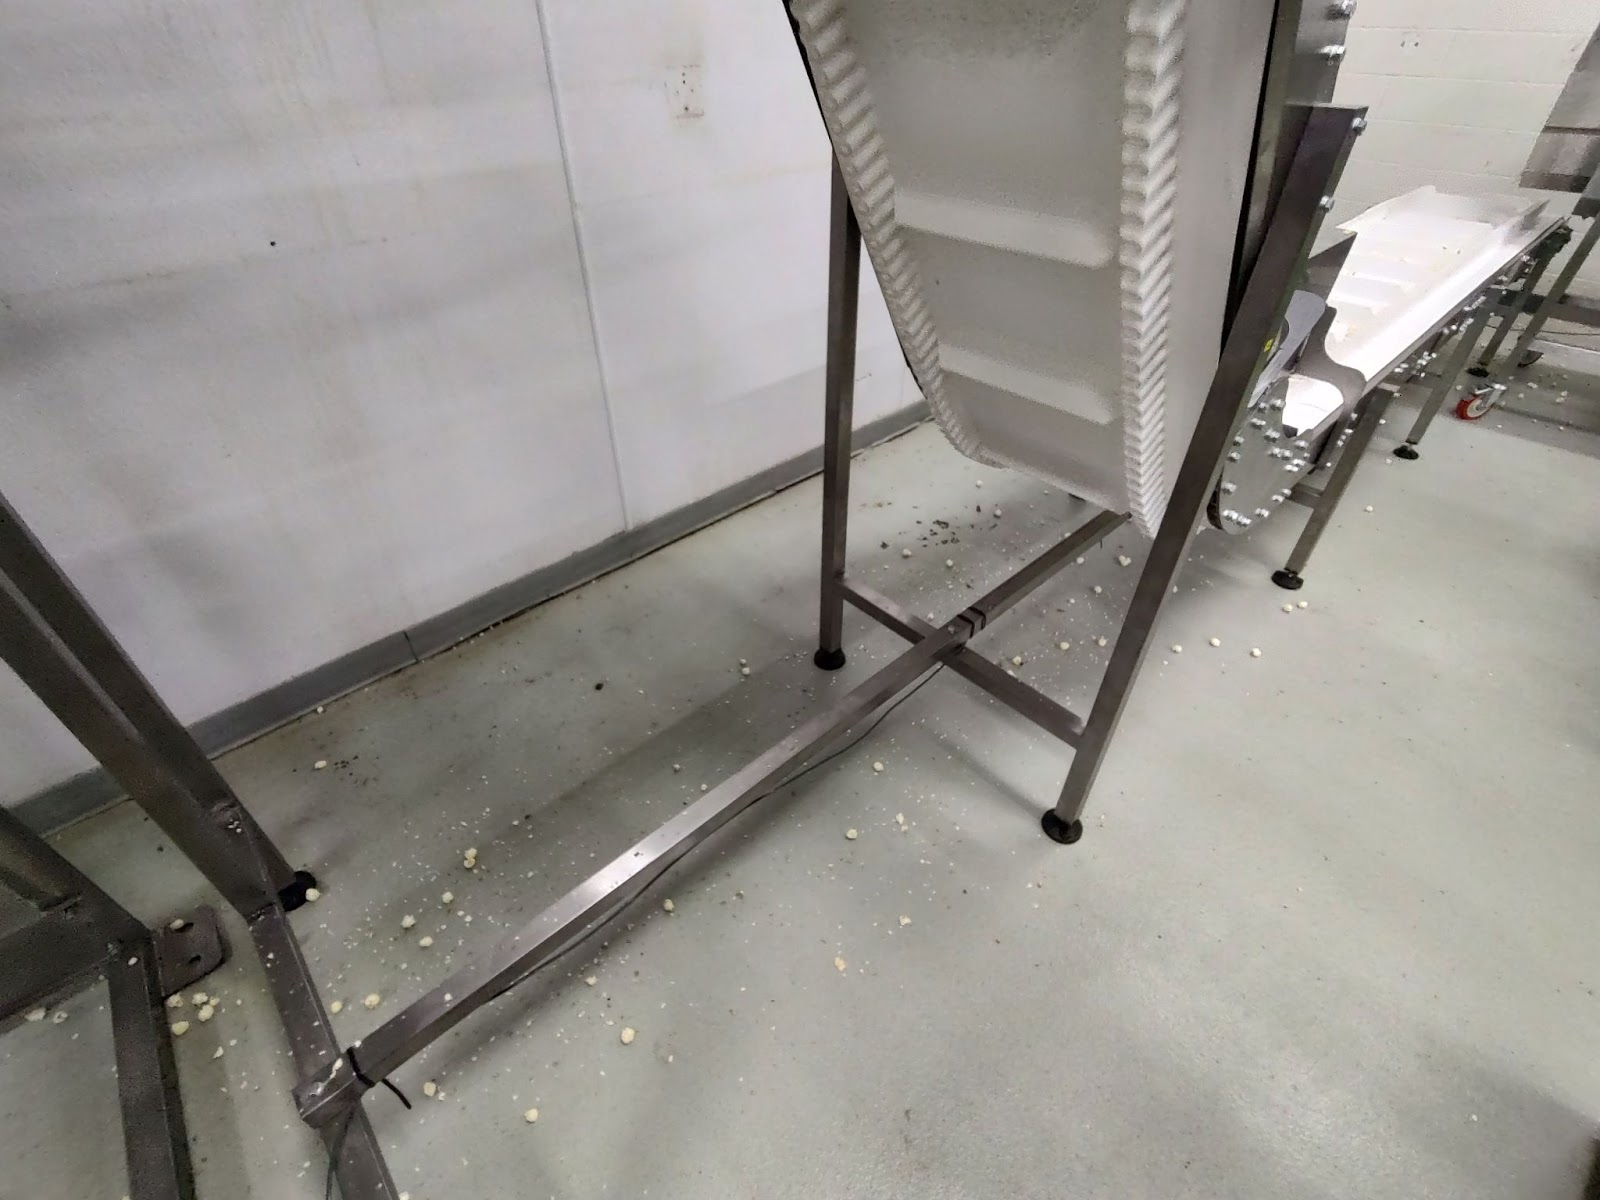
      There will be husks at the bottom of the conveyor and popcorn is a light product, so it sticks to the conveyor. Vacuum the area under the conveyor at the end of the day.


      Hopper - wipe stainless steel with a damp cloth. A soft mop with a long telescopic handle is usually used (you need a ladder, beware of falling from a height).

      Do not wash the hopper and Vibro feeder with a pressure washer! It is necessary to periodically wipe the optical sensors with a soft cloth so that they are not clogged with husks.

      Coater - wipe the outside with a damp cloth. Pull out the oil tube and oil hose from the coater (see Cleaning in the Oil Station Operating Manual). Do not wash with a pressure washer (infrared heaters can be damaged).

      Disconnect the wire from the IR heaters. Unfasten 4 clips, and remove the upper casing with two people. Remove the drum, wash with detergent (remove oil), and wipe. Wipe and clean the rollers (4 pcs) from the husk and oil - this is necessary for good contact between the drum and the rollers so that they do not scroll. Install the drum back - exactly on the rollers. Put on the cover, hook 4 clips, and connect the wire of the IR heater.

      Chain tension - there is a standard for chain sagging (from 4 to 7 mm), check periodically.


      The oil station is the dirtiest element. Do not wash with a pressure washer (thermal insulation will get wet and the wires inside will be shorted).

      At the end of the day, remove the oil tube from the coater, place it in a bucket of oil and use the Pump button to pump out the remaining oil in turn from tank 1 and tank 2. Close and remove the bucket.

      Pour hot water into both tanks (you can use soapy water), and turn on the mixers for a few minutes. Take an empty bucket and drain the dirty water from tank 1 and tank 2 one by one. Besides the fact that hot water cleans the tank itself, it also cleans the oil pipes and outlets - it is important that the oil does not freeze there! If it freezes, you will have to disassemble the entire system, it is long and difficult.

      If dirt remains inside, the procedure must be repeated. To clean the inner surface of the tanks, use only food-grade detergents; it is strictly forbidden to use abrasive and aggressive detergents (it can corrode scrapers, corrode metal, corrode hoses, and a peristaltic pump).

      At the end of washing, be sure to wipe both sensors and the recess around them with a cotton swab to remove any remaining dirt. This can critically affect the sensors

      What to check: fastening the motor bolts to the tank, fastening the tank bolts to the pedestal. If you pulled out the motor and the mixer, before reinstalling it, you must insert the mixer axis into the spindle sticking out exactly in the center at the bottom of the tank. When installing the lid with the motor and mixer, it is not necessary to twist the lambs too much, this makes it difficult for the mixer motor to work, it heats up and can burn out.


      Troubleshooting and possible malfunctions

      Grand Robopop220

      Clogging of the working chamber (the chamber is clogged with popcorn)

      The reasons:

      1. Optical sensor not calibrated

      2. Poor grain quality

      3. Too high grain feed rate

      4. Sifter rotating slowly (or not rotating)

      Important! Stop the machine using the Emergency Stop button. DO NOT OPEN the chamber cover - air entry may cause a fire. Let the device cool down. Then clean the chamber from the inside, clean the metal channel with a brush (grain is fed through it), and vacuum the chamber.

      The chamber clogging sensor is triggered, although the chamber is not clogged

      1. Optical sensor is not properly calibrated

      Machine warms up slowly

      1. One or more heating elements burned out (order new heating elements and install them, see example video1 https://youtu.be/EEywpZc6ZUY and video2 https://youtu.be/P1f_gPg4IiU  )

      2. Insufficient voltage in the network

      I connected my Grand Robopop220 to the RoboFactory line, but I can't change the settings via the touchscreen on the control box

      1. Most likely you have an old Grand Robopop220 with the old firmware. It is necessary to update the firmware of the DVP-12SA2 unit to the v42 level or replace the unit with the same unit with the new firmware (contact the supplier). This is what the desired block looks like inside the Grand Robopop220 electrical components box

      Sifter does not rotate

      1. The sifter is installed incorrectly (the guides are not on the rollers)

      2. Husk on rollers

      Camera light not on

      1. Bulb burnt out

      To replace lightbulb do the following. 

      1. Turn off the machine and disconnect it from the mains. Wait until the machine cools down.

      2. Take the chamber door off to open the chamber. 

      3. Backlight is located on the right sidewall of the chamber. 

      4. Remove four screws that hold the lamp screen and take the screen off. If it is stuck, carefully insert a flat screwdriver under the metal frame of the screen and turn it gently to detach the screen. 

      5. The lightbulb is being held by the spring-loaded socket. Shift the bulb upwards or downwards to release its opposite end, and then take the bulb out. 

      THE BULB MAY BE EXTREMELY HOT! BURN HAZARD! 

      6. One must not touch the new lightbulb with bare fingers; skin fat can cause bulb destruction during further operation. If the bulb is greasy, it is required to wipe it thoroughly with a soft, clean, and dry cloth before putting it in. 

      7. Once bulb replacing is done, put the protective screen back and fix it with four screws. Close the chamber. 

      The sifter rotates in the opposite direction

      1. Swap wires L1 and L2

      Grain pouring from the conveyor

      1. Mount the sifter over the conveyor (the edge of the sifter hangs over the conveyor)

      1. The edge of the sifter must be at least one section away from the edge of the conveyor, as shown in the figure below.


      Hopper and vibrating feeder

      Conveyor rotates in the opposite direction

      1. Change any two phases, and the direction of the conveyor will change. This must be done in the control cabinet (central control box)

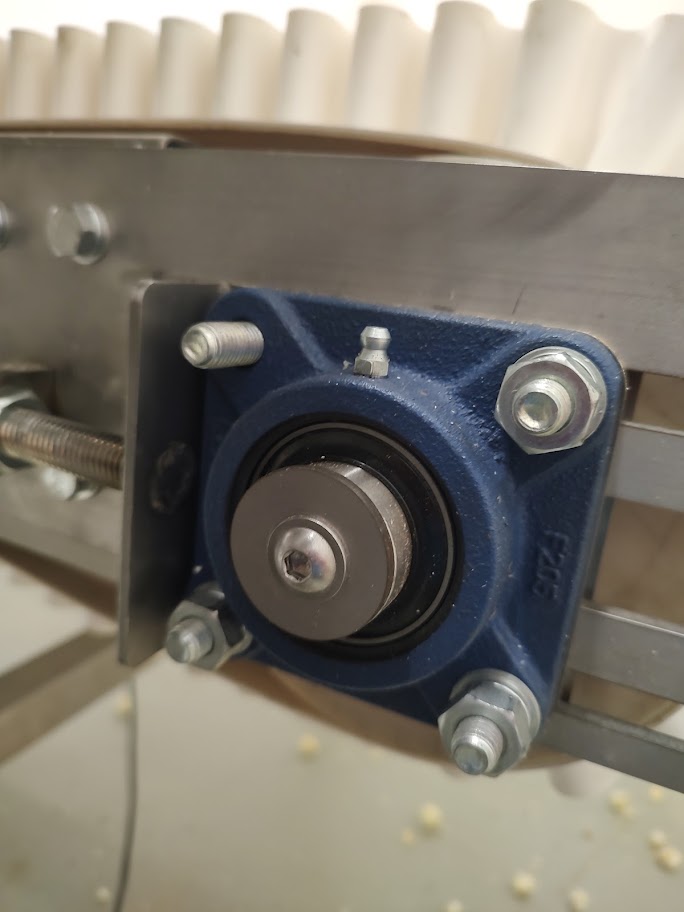
      Conveyor belt sags or regularly slips off one/several guide rollers

      1. Pull the roller (Idle Roller). This roller requires periodic advance - every 250 hours of operation (but the first 1000 hours - every 50 hours)

      To do this, first, loosen 4 nuts (wrench 17). And then with a 23 wrench, turn the nut on the guide pin in the direction of the red arrow. After that, tighten the 4 nuts again with a 17-wrench. Make sure that the distances on the stud are the same on both sides of the conveyor, otherwise, the roller will warp and it may stall during rotation.

      A conveyor belt moves too slowly, Grand Robopop220 popcorn spills out

      1. Increase the speed of the tape in the settings on the touchscreen. Find a conveyor, there will be a rectangle with numbers next to it. Hold it with your finger, a data entry window will appear. Enter the desired value and press Enter.

      Popcorn accumulates under the conveyor belt

      1. This is part of the operation of the conveyor - a small part of the popcorn sticks to the conveyor and falls already under the conveyor. Remove fallen popcorn promptly.

      The motor began to make creaking sounds

      1. Check drive roller bearing lubrication. It needs to be lubricated on both sides once a month. Recommended lubricant - Shell Alvania 2, 3 or Castrol LM, LMX

      The conveyor belt is not moving. Electricity is ok.

      1. Check the connection of the conveyor to the control cabinet, the contact may have come off.

      2. Check the efficiency of the conveyor motor - open the box with wires, and measure the resistance between windings 1-2, 2-3, 3-1. It should be about the same. If somewhere it is very different or OL (open circuit) - the motor must be replaced

      The motor moves/vibrates slightly while the conveyor is moving.

      1. This is normal, as intended by the supplier.

      https://drive.google.com/file/d/1XgEZvYvfMwpNA9ITNmMGCmTdKRVHeEU3/view?usp=sharing


      Hopper and vibrating feeder

      The touchscreen displays “Low level” when the tank has popcorn.

      1. Check the condition of the Low-level sensor. Is it calibrated? Has his head been cleaned? Does it have power (is the indicator light on)? Check the indication - if there is no product at the sensor, one green light is on. When there is a product, the orange and green lights should be on simultaneously. The test can be performed by sliding a piece of white paper under the sensor. Disconnect the wires from the sensor and reconnect.

      1. Check where the sensor “shoots” - it may have shifted and “looks” into the hopper body (the laser beam hits the metal body of the hopper, not the product)

      Why do we need two level sensors and how do they work?

      1. The top sensor is set to a longer distance than the bottom sensor - it needs to catch the heap cone to prevent overflow.

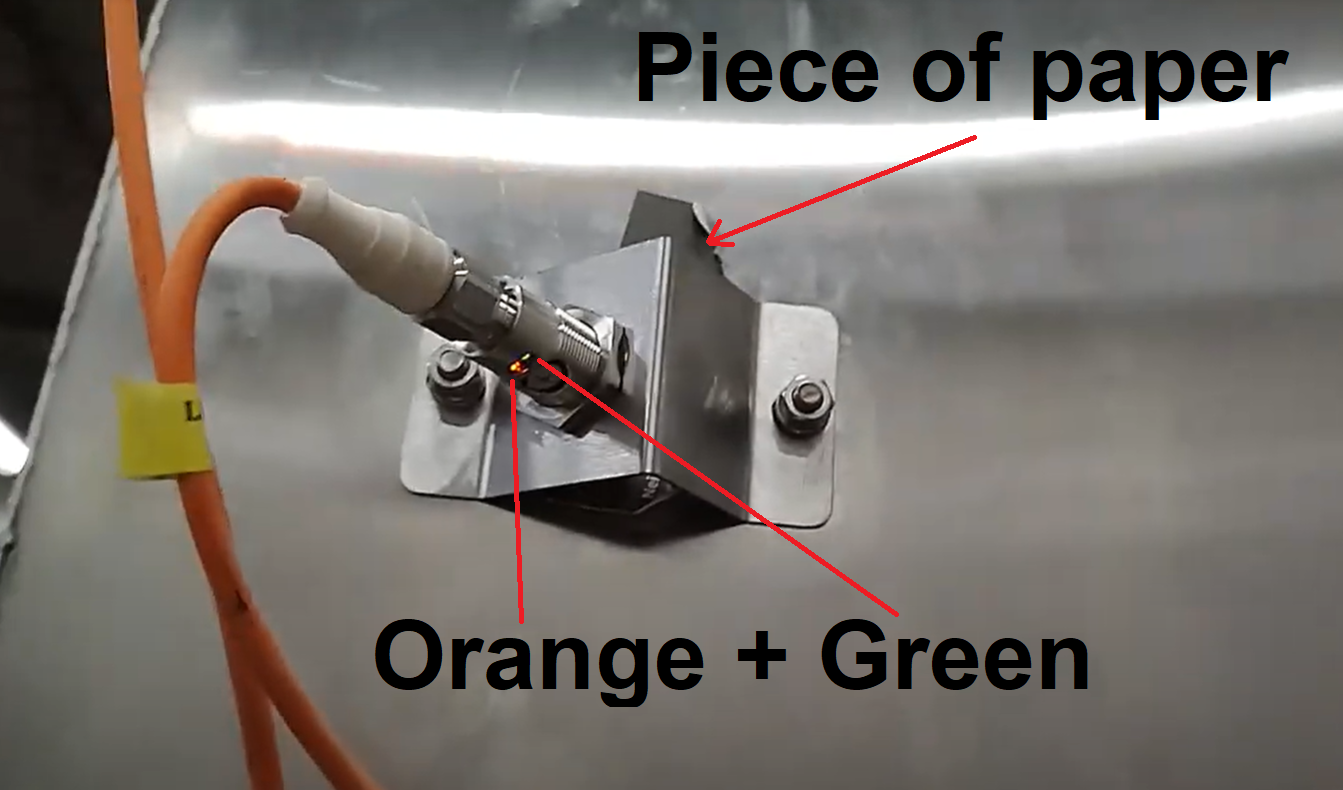
      The sensors must come immediately with cables labeled accordingly. If something was disconnected/reconnected, the sensors may have been mixed up in places. This is also indicated by the video https://photos.app.goo.gl/jTvf95tJLAs8KsQQ7  - at the beginning, when the lower sensor is not blocked, the panel shows the EMPTY state, which means that the upper sensor worked at that moment. After the lower sensor is covered, the panel displays two states at the same time, which of course cannot be, but the program simply processes the sensor signals.

      1. The mounted sensor is located outside the bunker and "shoots" into the gap in the bunker wall. When installing the sensor bracket, make sure that the beam hits the hole directly and is not obstructed by the bin wall. This may be the reason why the upper sensor has tripped when the hopper is empty.

      2. If, for some reason, the settings for the sensing distance have gone astray, then the upper sensor may react to the opposite wall of the hopper, reflecting from it, which again leads to an incorrect signal.

      I recommend checking the response distances of both sensors, taking into account the above. Correctly shield the sensor beam with white paper inside the hopper. Calibrate with a screwdriver - turn the screw until the sensor triggers (orange and green signals are on simultaneously)

      Vibratory feeder and hopper are enabled on the Touch screen, but they do not work

      1. Check the position of the “On/Off” side lever switch on the hopper body. If it is disabled, then neither the hopper nor the vibratory feeder will work..

      1. You can also start both elements in manual mode by turning on the side lever and pressing the “Start” button (the green light will turn on).

      Vibratory feeder on but popcorn not moving

      1. Too little vibration. Increase it in manual mode on the adjustment module with the Up arrow

      1. The vibratory feeder tray is dirty (for example, with oil - it is sticky). The popcorn is stuck to it and cannot move and slide freely. Stop the hopper and vibratory feeder. Wipe the tray clean, and turn it on again. Check if the oil supply pipe is installed incorrectly.

      I see some washers, but I don’t understand why they are?

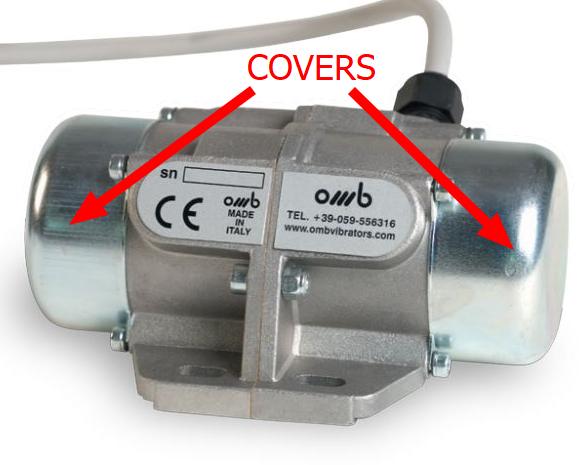
      Those semi-round segments are intended to be put inside the vibrating motor, see the picture attached. More segments put in the motor cause more intensive vibration of the hopper. If you see that popcorn inside the hopper tends to "stick" to the walls, then it makes sense to add a few segments, increased vibration might help popcorn to leave the hopper.

      1. Unplug the machine.

      2. Open two covers on the sides of the motor (see another picture attached).

      3. Add segments on each side. The number of segments added on each side must be equal!

      4. Close the covers.

      5. Attach the motor back to the hopper.

      6. Run the machine.

      The sensor shows that the hopper is full, but nothing is spilling over the edge.

      1. The sensing distance of the upper sensor is longer than that of the lower one. He has to catch the “slide” near the mountain of popcorn in a hopper. That is, as soon as the top/slope of the mountain reaches the laser beam, the sensor is triggered (distance is about 1.5 feet). This is done because there is already a lot of popcorn in the hopper. It doesn't need to be done anymore. You need to work out the popcorn that is. Put the Grand Robopop220 into pause mode and wait for the High-level sensor to stop working


      There is a lot of popcorn in the hopper, but the top sensor did not work!

      1. Check visually where exactly in the hopper the “top” of the mountain is formed. It should form in the center. If the conveyor and hopper are offset from each other, the top of the mountain may form in the corner farthest from the sensor. In this case, it will take a long time before he picks up a signal from the “mountainside”. Center the position of the hopper on the conveyor so that the hill forms in the center.

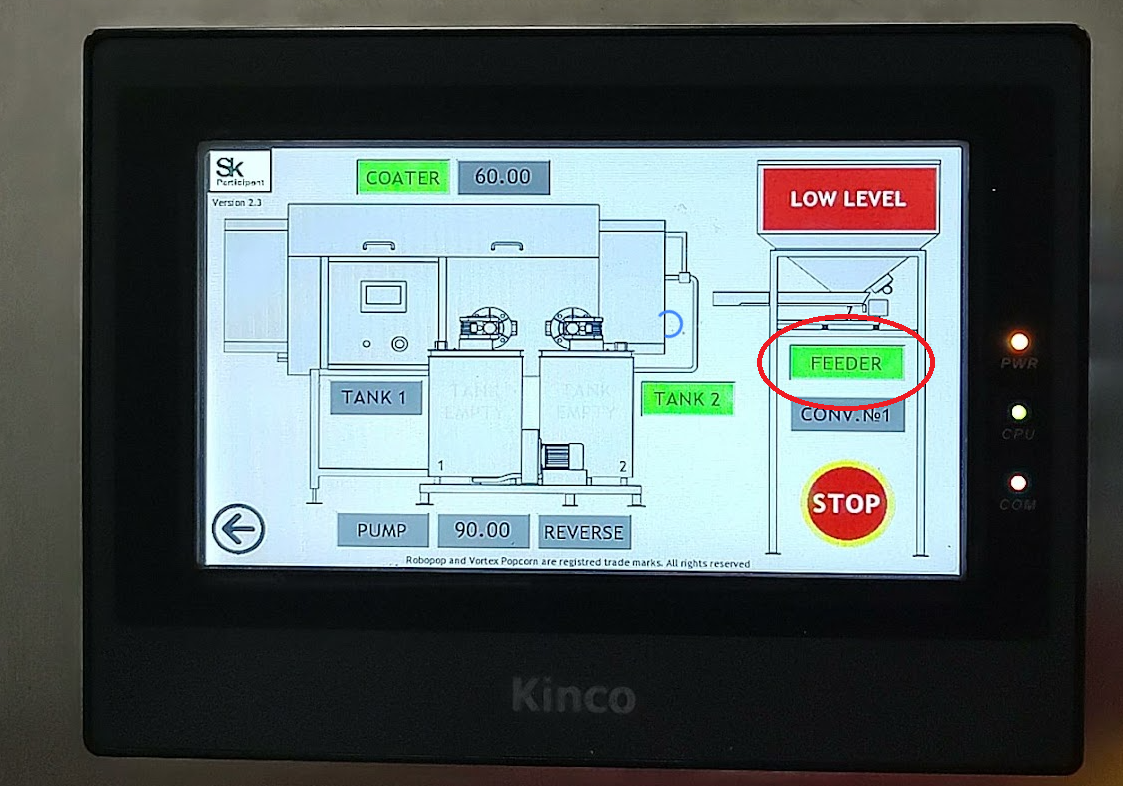
      On the touchscreen, I see Feeder and Conv icons. No. 1, but only Feeder works

      1. This is one of the firmware versions. In your case Feeder (hopper vibration) and Conv. No. 1 (tray-vibrating feeder) is connected in parallel and both are turned on with the Feeder button. However, you can still turn off the vibratory feeder manually using the start/stop button on the hopper side controller.


      Oil station


      Mixers spin in the opposite direction https://photos.app.goo.gl/AxKqiUafzkEaz8yT8

      1. Change any two phases inside the oil station control cabinet (see pic), the rotation direction of the mixers will change

      One or both mixers are spinning heavily, the motor is hot

      1. Something is preventing the mixer from turning. Check the tightness of the wing caps on the lid of each tank, they may be too tight. Loosen the tightening, and check if the mixer has become freer to rotate

      2. The product is stuck to the bottom and does not allow the mixer to rotate. Take a bucket, turn on the pump and drain the tank (or put the oil hose nozzle into the second tank and drive the remaining oil there). Examine the bottom - if the product is stuck there, unscrew the lambs, and pull out the lid with the mixer and the motor. Clean the bottom with a plastic scraper. Make sure that there are no lumps of product in the tubes and that there is no blockage. If necessary, pour hot water and turn on the pump again, drain the water and lumps of the product into a separate bucket.

      Sometimes the cheese mixture will harden at the bottom because the protein has curdled. This is due to overheating (the milk protein in the cheese mixture overheats at temperatures over 55°C /130°F). Do not overheat the mixture!

      One or both mixers seem to vibrate when rotating, the cover of the oil tanks moves and vibrates

      1. Open the oil tank lid, and make sure the mixer shaft is on the spindle, centered exactly on the bottom of the tank. Perhaps you missed the installation and the mixer axis makes circular movements around the spindle. Unscrew the winglets, lift the lid with the motor, and put the mixer axle on the spindle in the center. Twist the lambs, check the rotation of the mixer.

      I see a blue glow near the oil tank, what does this mean?

      1. If you remove the protective cover, you will see a volume sensor. If the tank is empty, it does not glow. If there is oil in the tank, you will see a blue glow. Sometimes the sensor glows even if the tank is empty - this indicates that the sensor is dirty (see below).

      The sensor on the touchscreen indicates that there is oil in the tank, although the tank is empty.

      1. Contamination around the sensor in the product contact area (hardened oil mixture, for example). Must be checked and cleaned if necessary.

      1. Sensor head damage. It is necessary to check the integrity visually and by touch.

      2. Changing the position of the sensor (if one of the employees unscrewed the sensor

      My Volume sensor is out of order, can I buy an analog and install it myself?

      1. 25486 is the LBFS-01111.0 Baumer sensor. However, the problem is that the sensor is configured at the factory using a special programmer and software.

      2. A sensor with default settings will probably not work correctly.


      What to do so that the oil in the pipes does not freeze

      1. Always turn on reverse when you pause. This will collect most of the oil from the oil tube back into the tank.


      1. When cleaning, use hot water to flush the tanks - this will also flush the hoses of oil residue on the walls.

      2. Do not use very hot water (above 70°СF/ 158°F) - oil system hoses are not heat resistant, and high temperatures are detrimental to their durability.

      Can oil be left in tanks overnight?

      1. As for the question about the constant heating of the tanks, the instructions have a clear indication of the need for daily cleaning.

      2. Thus, the situation "keep the heater on so that the oil does not freeze" should not arise at all. The line is either running and the oil is in the tank at operating temperature, or the line is not running and the tank is clean. Storage of oil or oil mixture in the tanks of the product is not provided.

      There is some black short piece of hose in the kit, what is it? Can it be thrown away?

      1. This is a spare hose for the peristaltic pump. Don't throw it away, save it for future use

      I have a clogged oil pipe, can I set the pump to maximum power and clean it this way?

      1. You can really try it, but it's far from certain that it will help. The peristaltic pump is specially made "soft" - it does not create a lot of pressure. First of all, this is necessary so that the oil does not splatter (it is very difficult to wipe off). Secondly, it makes the oil supply more uniform (evenly applied to the product).

      2. You can also try to turn on the reverse, drive off the oil, and then turn on the feed again.

      3. In extreme cases, you need to disassemble the oil pipe system - unscrew the clamps, move the hoses by rotating clockwise and counterclockwise and pull them out. Flush both short hoses, and flush the long hose. Check the condition of the T and L-shaped taps (here it is useful to have a flexible plumbing brush) Blockage can also occur in the peristaltic pump. Here is a video on how to get the hose out of it:https://youtu.be/wm5p67aqBr0

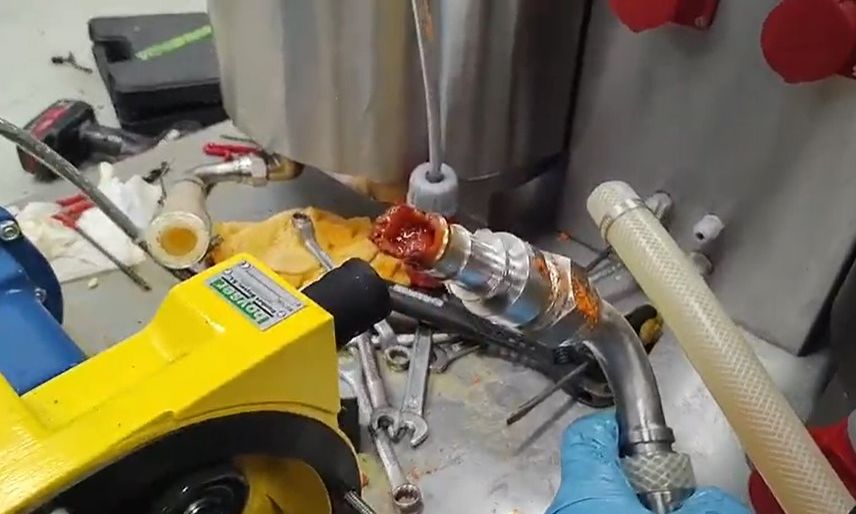
      I have a clogged spout at the end of the oil system. It is inside and nothing flows out of it.

      1. Several holes with a diameter of 5 mm are made in the spout. If you have clumps of product in your oil mixture, they can clog one or more holes. This is critical - the more holes are clogged, the more difficult it is for the oil mixture to come out. The pressure builds up and the spout can simply knock out from the end of the oil tube (it is not fixed with a thread, only with a rubber seal - this is a safety measure)

      Is it possible to work without a spout at all

      1. Theoretically, it is possible, but the oil mixture will be supplied with a thicker jet, which adversely affects the quality of the coating. This is especially important at high oil pump speeds.

      How to properly install the spout?

      That's right:


      That's so wrong and right


      First, the metal end of the oil hose is inserted into the bracket, and then the spout is inserted into it (it must be inserted with force, it is fixed with an internal rubber o-ring). The oil from the spout must NOT come into contact with the vibratory feeder tray.

      I turned on the oil station, added oil, and the temperature on the Autonics sensors went down. Why?

      1. Check the wire connection at terminals BT1 and BT2. These are thermocouple terminals. If the polarity is reversed (+/-), then the sensor will show a drop in temperature, although it is actually growing. Disconnect the VT1 wires (black and white), swap them, and fix them. Check the readings of the Autonics temperature sensor. If everything is in order now, do the same for the black and white wires of VT2

      Is it possible to increase the rotation speed of mixers inside oil tanks

      1. This can be done, not with a touchscreen, but with a Delta VFD inverter inside the oil station control cabinet. Study the Appendix to the operation manual of the Oil Station, there are inverter settings

      What ingredients can be used in an oil station?

      1. Fine dispersion is important - the finer the grinding, the better. For example, coarse granular salt will work as an abrasive inside a tank. Therefore, it is necessary to use a special finely dispersed salt.

      Why do oil system components get clogged?

      1. You need to research the recipe - exactly what ingredients you use. Some, such as cheese powder, are temperature sensitive. Above 55°C/130°F, the milk protein in the cheese powder begins to coagulate, the powder lumps, cakes, and begins to clog the system. Other ingredients do not dissolve in oil, are heavier than it (by density), and can accumulate at the bottom (paprika). Some ingredients (grass, dill) tend to stick together, which also leads to clogging. The supplier company can guarantee the operation of the equipment - technology. But it does not guarantee technology - that any of your recipes will work stably on the RoboFactory line.

      Below is a photo of the cured cheese mixture - avoid overheating the mixture/clogging the tubes

      Can oil tanks be loaded with solid oil?

      1. In no case. Although oil tanks are heated, they are designed to heat liquid oil, not to melt solid oil. If the oil in the bucket has hardened, heat it up (Excalibur, ordinary spiral tiles, RP60 heating compartment overnight) and load it into oil tanks only when it is liquid

      2. However, you do not need to heat the oil to the correct temperature before you fill it into the tanks. Just enough to be liquid.

      Give the recipe for the butter-cheese mixture for the RoboFactory line:

      1. We use the following recipe. For example, for our cheese mixture, we use the following weight ratio: 1/0.45/0.05 (butter, cheese, salt, respectively).

      2. You can use your recipe.

      Why is it so important to use finely divided salt for cheese mixture?

      1. As for powder cheese, it is not pure, there is always a base on which it is applied, most likely dextrin, you need to look at the product passport. Often cheese is generally butter, and the base (starch), a little cheese, flavoring, and coloring. So it sticks and hardens along with all the other ingredients.

      I want to buy RoboFactory equipment, but I'm not sure if my recipe will work?

      1. In general, you need to keep in mind that there is a technique, and there is a technology for preparing a product, and these are different things (although related). From this, it follows, for example, that it is pointless to indicate any recipes in the instructions for such equipment because enterprises usually have a technologist who knows his recipes. And the physical launch of the line (so that everything spins and moves) is only a small part of the launch process.

      2. The main part is adjusting the production process to the finished product, and this part cannot be described in any instructions, it must be done on-site. You must have a food engineer, or you must have a good understanding of your product and recipe. If you have any doubts - contact a Robolabs representative for information - our team has engineers, technologists, and service specialists who will help you find the answer.

      3. You can email your recipe to our head of R&D department at advice@robolabs.pro


      Subscribe to  news and promotions:
      Company
      About RoboLabs
      RoboLabs History
      Patents & Certificates
      Dealers
      Privacy Policy
      Conditions
      Catalog
      RoboPop Popcorn Machines
      RoboSugar Caramelizer
      Cotton Candy Machines
      Popcorn Display Warmers
      Automatic French Crepes
      Popcorn Accessories
      Popcorn Factory
      Services
      Showroom Trial
      Contacts

      Call/Text +1 (810) 373-5037
      1761 E Genesee Ave.
      Saginaw, MI 48601

      © 2023 All rights reserved.
      ​